项目配置

groupId 要求

项目的groupId一般为域名倒置,比如我的网址为wangfeng.pro,groupId则可以命名为pro.wangfeng。如果你没有属于自己的域名,则最好使用github相关的groupId,比如你的项目地址的github路径为https://www.github.com/username/projectName,那groupId最好为com.github.username
groupId的命名规范关系到在接下来的Sonatype OSSRH审核能否通过。

修改 pom.xml

1
2
3
4
5
6
7
8
9
10
11
12
13
14
15
16
17
18
19
20
21
22
23
24
25
26
27
28
29
30
31
32
33
34
35
36
37
38
39
40
41
42
<!--开源协议-->
<licenses>
<license>
<name>The Apache License, Version 2.0</name>
<url>http://www.apache.org/licenses/LICENSE-2.0.txt</url>
</license>
</licenses>

<!--开发者信息-->
<developers>
<developer>
<name>wf2311</name>
<email>wf2311@163.com</email>
<roles>
<role>developer</role>
</roles>
<timezone>+8</timezone>
<organization>wf2311</organization>
<organizationUrl>https://www.wangfeng.pro</organizationUrl>
</developer>
</developers>
<scm>
<connection>scm:git:https://github.com/wf2311/common-lang.git</connection>
<developerConnection>scm:git:https://github.com/wf2311/common-lang.git</developerConnection>
<url>https://github.com/wf2311/common-lang</url>
<tag>v${project.version}</tag>
</scm>

<!--仓库-->
<distributionManagement>
<!--快照库-->
<snapshotRepository>
<id>ossrh</id>
<url>https://oss.sonatype.org/content/repositories/snapshots</url>
</snapshotRepository>
<!--正式库-->
<repository>
<id>ossrh</id>
<name>Maven Central Staging Repository</name>
<url>https://oss.sonatype.org/service/local/staging/deploy/maven2/</url>
</repository>
</distributionManagement>

注意将其中与项目相关的路径修改为当前项目的
加入相关插件:

1
2
3
4
5
6
7
8
9
10
11
12
13
14
15
16
17
18
19
20
21
22
23
24
25
26
27
28
29
30
31
32
33
34
35
36
37
38
39
40
41
42
43
44
45
46
47
48
49
50
51
52
53
54
55
56
57
58
59
60
61
62
63
64
65
66
<build>
<plugins>
<!--编译插件-->
<plugin>
<groupId>org.apache.maven.plugins</groupId>
<artifactId>maven-compiler-plugin</artifactId>
<configuration>
<source>1.8</source>
<target>1.8</target>
</configuration>
</plugin>
<plugin>
<groupId>org.apache.maven.plugins</groupId>
<artifactId>maven-surefire-plugin</artifactId>
</plugin>

<!--源码插件-->
<plugin>
<artifactId>maven-source-plugin</artifactId>
<executions>
<execution>
<id>attach-sources</id>
<goals>
<goal>jar</goal>
</goals>
</execution>
</executions>
</plugin>

<!--javadoc插件-->
<plugin>
<artifactId>maven-javadoc-plugin</artifactId>
<version>2.9.1</version>
<executions>
<execution>
<id>attach-javadocs</id>
<goals>
<goal>jar</goal>
</goals>
<configuration>
<encoding>UTF-8</encoding>
<additionalparam>-Xdoclint:none</additionalparam>
</configuration>
</execution>
</executions>
<configuration>
<encoding>UTF-8</encoding>
</configuration>
</plugin>

<!--gpg签名插件-->
<plugin>
<groupId>org.apache.maven.plugins</groupId>
<artifactId>maven-gpg-plugin</artifactId>
<executions>
<execution>
<id>sign-artifacts</id>
<phase>verify</phase>
<goals>
<goal>sign</goal>
</goals>
</execution>
</executions>
</plugin>
</plugins>
</build>

修改完以上配置后,将代码同步到github上面。

注册 Sonatype OSSRH

注册地址:https://issues.sonatype.org/secure/Signup!default.jspa

提交一个 ISSUE

登录成功后,进入首页,点击页面上方的 Create 按钮,弹出如下窗口:
打开创建ISSUE窗口

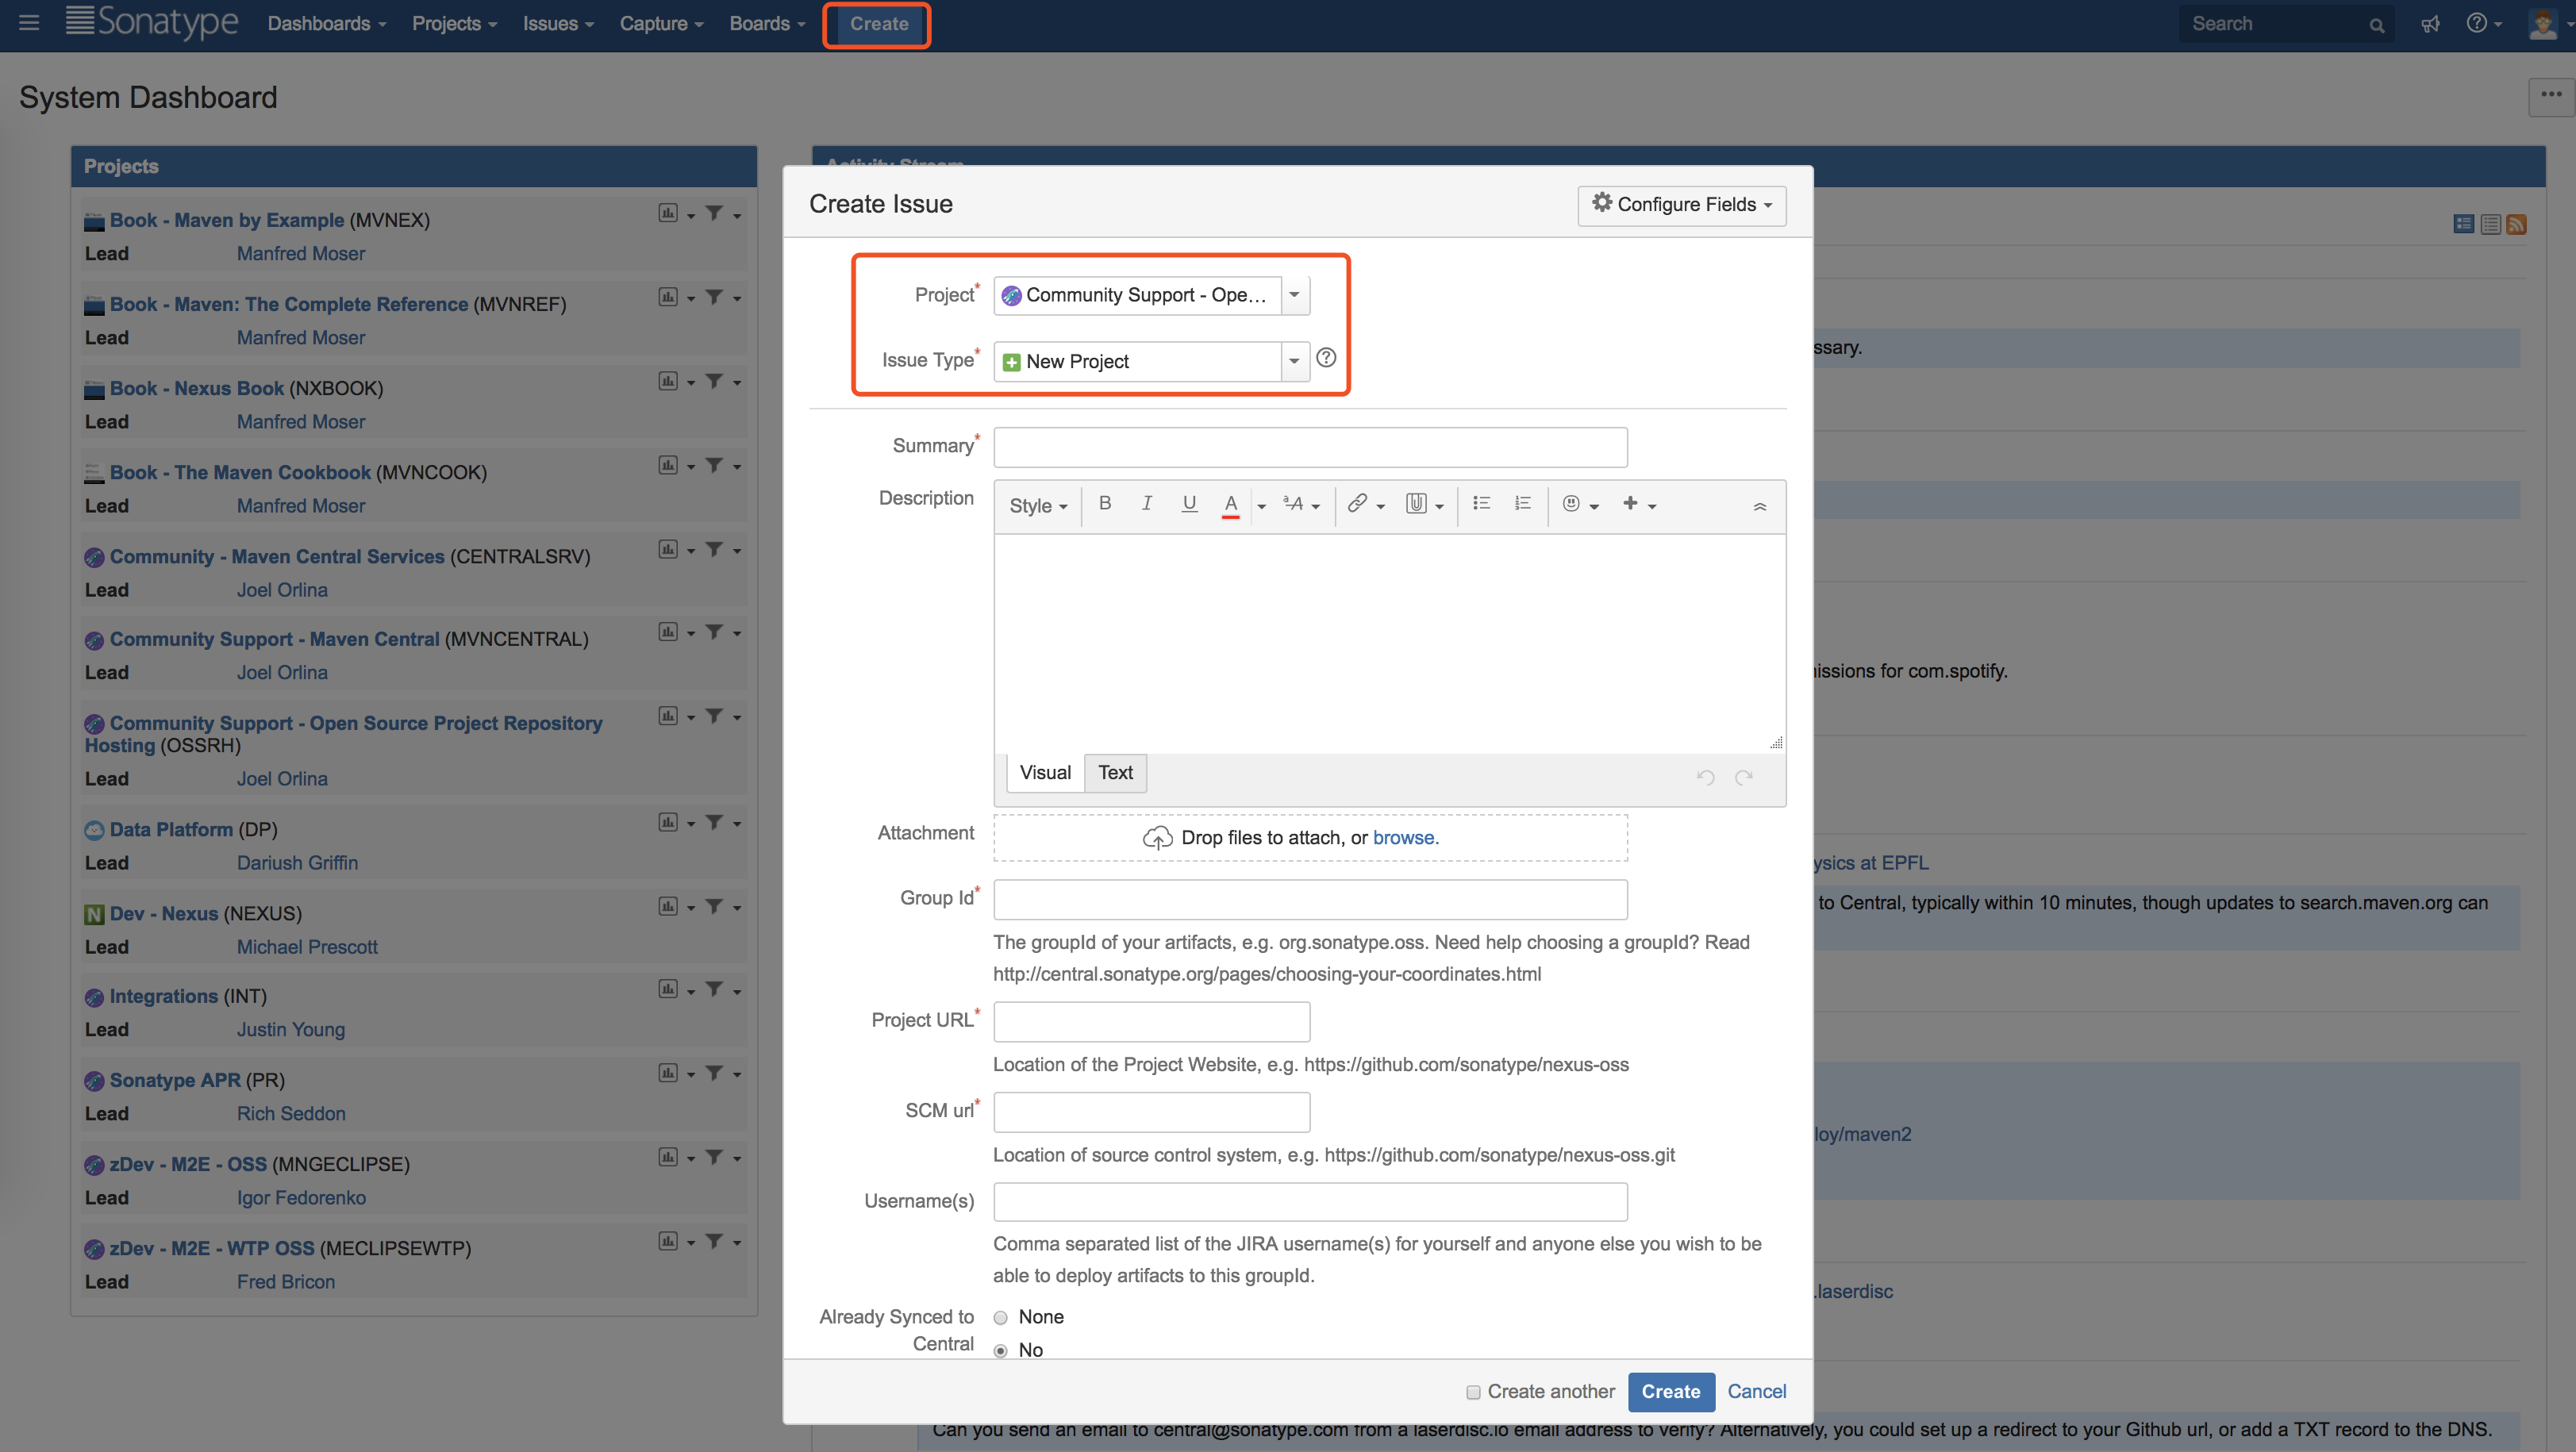
Project 选择 Open Source Project Repository Hosting
Issue Type 选择 New Project
Summary 可以填你的项目名称
其它的必填项请参考示例填写,填写完成后点击下方的 Create 按钮提交 ISSUE 。
填写表单

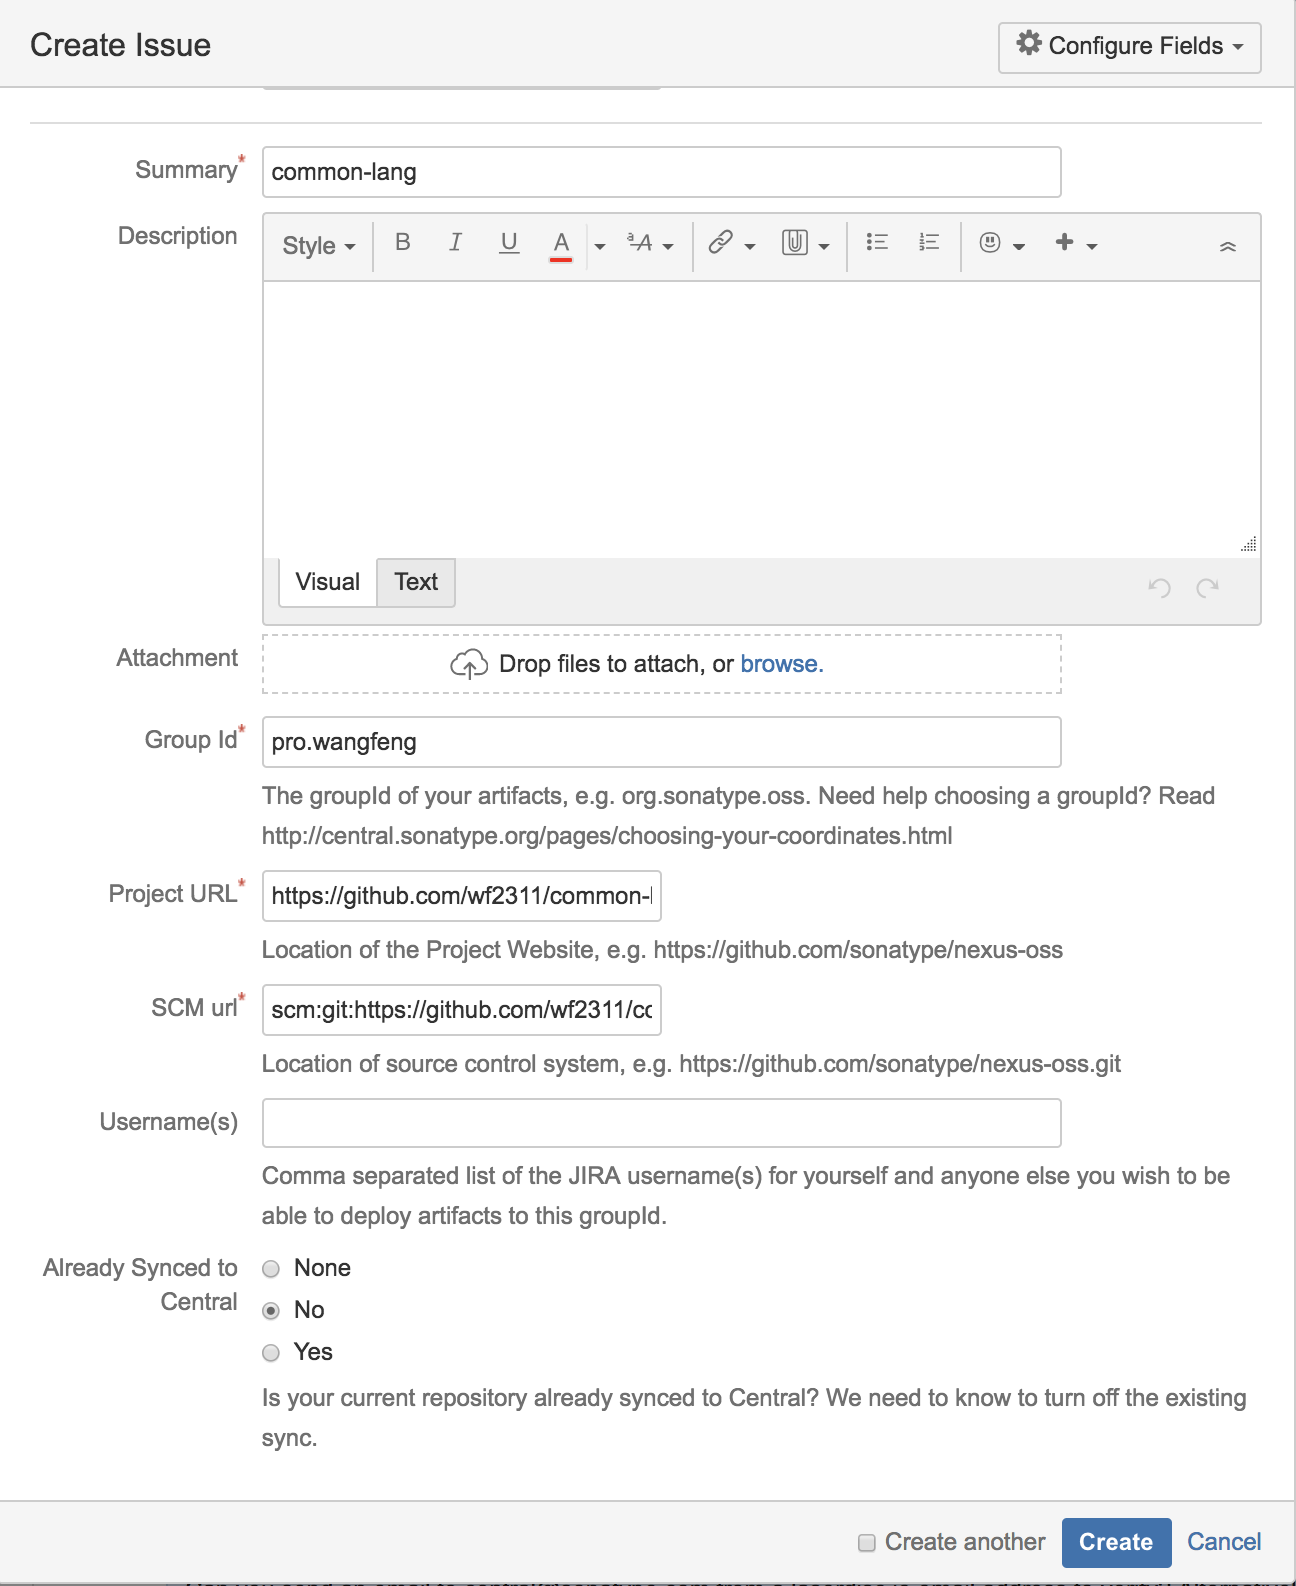
提交成功后,点击页面上方的 Issue 按钮,可以看到刚刚你提交的 ISSUE :
前往ISSUE详情页

稍等片刻,你就会审核者的相关评论,询问你填写的groupId对应的域名是不是属于你的:
审核者确认信息

然后你需要点击下方的 Comment 按钮回答审核者,向他确认该域名是属于你的:
点击Comment按钮

这个确认过程可能需要你和审核者交流几个来回才能搞定,具体过程可参考笔者的一个ISSUE案例

当最终审核通过后,你将收到审核者的如下回复:
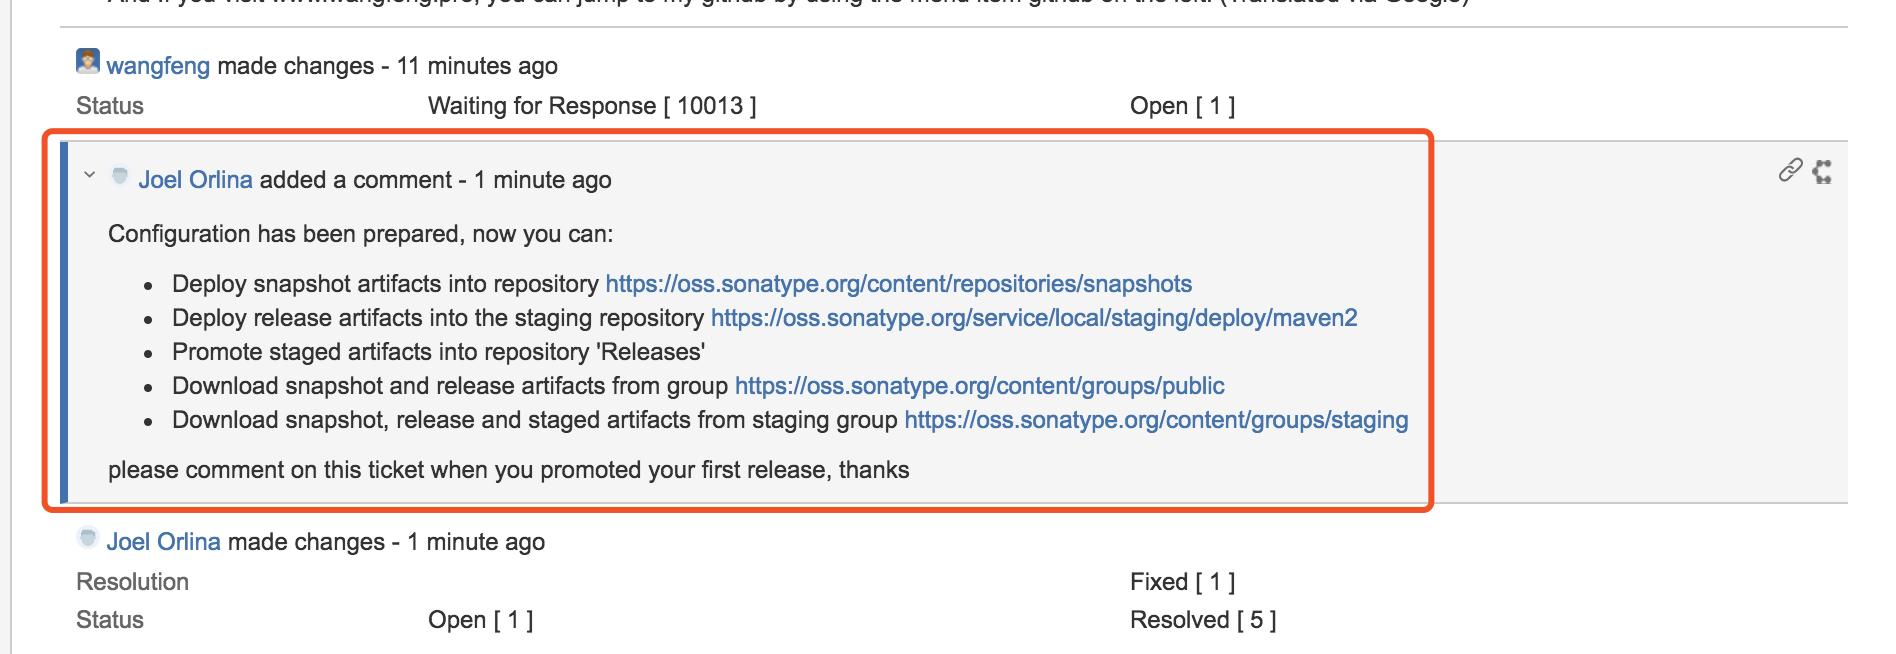
审核通过

并且该 ISSUE 的状态将变为RESOLVED
审核通过状态

至此,你就有权限将该项目发布到maven中央仓库中了。

注意:如果你还有其它的项目也需要发布到中央仓库,并且 groupId 和上面的一样,就不需要再次创建 ISSUE 了;只有在使用新的 groupId 时才需要提交 ISSUE。

gpg安装配置

安装 gpg

由于各个系统版本的 gpg 安装方式不尽相同,这里就不写详细安装方式了。具体步骤可以 google 、百度或者按官网上给的步骤下载安装。

安装完成后在终端或命令行运行以下命令,确认是否安装成功:

1
gpg --version

出现类似信息表上安装成功:

1
2
3
4
5
6
7
8
9
10
11
12
13
14
gpg (GnuPG) 2.1.21
libgcrypt 1.7.8
Copyright (C) 2017 Free Software Foundation, Inc.
License GPLv3+: GNU GPL version 3 or later <https://gnu.org/licenses/gpl.html>
This is free software: you are free to change and redistribute it.
There is NO WARRANTY, to the extent permitted by law.

Home: /Users/wf2311/.gnupg
支持的算法:
公钥:RSA, ELG, DSA, ECDH, ECDSA, EDDSA
对称加密:IDEA, 3DES, CAST5, BLOWFISH, AES, AES192, AES256,
TWOFISH, CAMELLIA128, CAMELLIA192, CAMELLIA256
散列:SHA1, RIPEMD160, SHA256, SHA384, SHA512, SHA224
压缩:不压缩, ZIP, ZLIB, BZIP2

生成密钥对

以 Mac 下操作为例,不同系统的过程可能有所差异
运行命令:

1
gpg --gen-key

会让你输入真实姓名:

1
2
3
4
5
6
7
8
9
10
11
gpg (GnuPG) 2.1.21; Copyright (C) 2017 Free Software Foundation, Inc.
This is free software: you are free to change and redistribute it.
There is NO WARRANTY, to the extent permitted by law.

Note: Use "gpg2 --full-generate-key" for a full featured key generation dialog.

You need a user ID to identify your key; the software constructs the user ID
from the Real Name, Comment and Email Address in this form:
"Heinrich Heine (Der Dichter) <heinrichh@duesseldorf.de>"

真实姓名:

输入 你的姓名(至少为5个字符) ,回车
再输入你的电子邮箱 ,回车,出现:

1
Change (N)ame, (E)mail, or (O)kay/(Q)uit?

选择 O 回车,出现如下提示:

1
2
我们需要生成大量的随机字节。这个时候您可以多做些琐事(像是敲打键盘、移动
鼠标、读写硬盘之类的),这会让随机数字发生器有更好的机会获得足够的熵数。

并且提示让你输入密码,输入密码后回车,
稍等片刻就会出现如下生成信息:
gpg 生成步骤
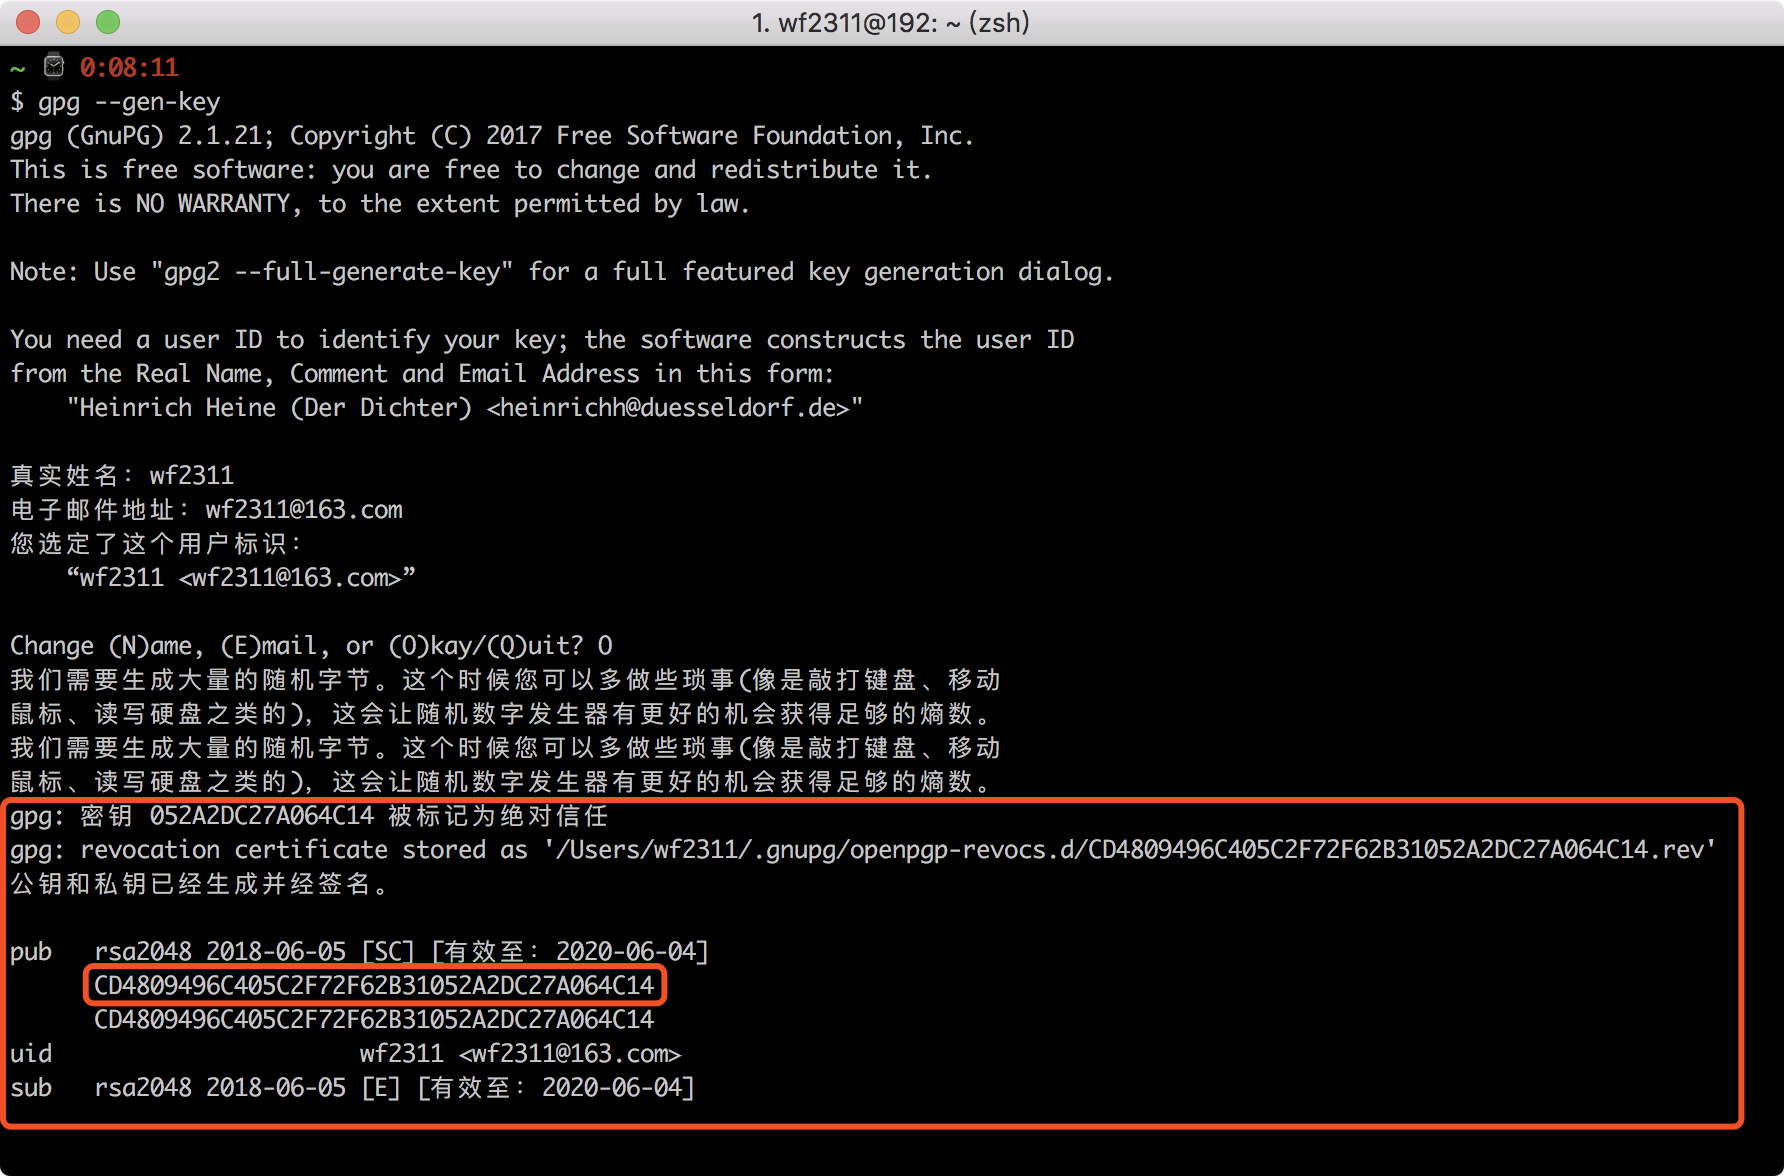
图中的CD4809496C405C2F72F62B31052A2DC27A064C14即为生成的公钥

发布公钥到 GPG 密钥服务器

运行命令:

1
gpg --keyserver hkp://pool.sks-keyservers.net --send-keys CD4809496C405C2F72F62B31052A2DC27A064C14

此操作因为网络原因可能需要等待一定的时间

查询公钥是否发布成功

运行命令

1
gpg --keyserver hkp://pool.sks-keyservers.net --recv-keys CD4809496C405C2F72F62B31052A2DC27A064C14

出现类似以下信息即表示发布成功:

1
2
3
gpg: 密钥 052A2DC27A064C14:“wf2311 <wf2311@163.com>”未改变
gpg: 合计被处理的数量:1
gpg: 未改变:1

更多 gpg 命令请参考阮一峰的GPG入门教程

修改 maven 配置文件

在maven的配置文件 settings.xml 中添加以下内容:

1
2
3
4
5
6
7
8
9
10
11
12
13
14
15
16
17
<servers>
<server>
<id>id须与pom.xml中distributionManagement下设置的id保持一致</id>
<username>注册Sonatype账号是填写的用户名</username>
<password>注册Sonatype账号是填写的密码</password>
</server>
</servers>

...

<profile>
<id>gpg</id>
<properties>
<gpg.executable>与gpg版本有关mac下一般填写gpg2,window下填gpg</gpg.executable>
<gpg.passphrase>生成gpg秘钥过程中填写的密码</gpg.passphrase>
</properties>
</profile>

打包上传

切换到当前项目路径,运行命令:

1
mvn -DskipTests clean deploy

正常情况下,如果运行成功未出错,项目会打包并上传的对应的仓库中:

提示: 如果在 Mac 环境下打包是出现 gpg 相关的错误,可以参考 gpg: 签名时失败处理这篇文章来处理

在 OSS 中发布构件

登录

登录 https://oss.sonatype.org,用户名密码与上面 Sonatype 的相同

发布构建

登录成功后会进入如下页面:
neuxs 管理页面

点击左侧的 Build Promotion 下的 Staging Repositories,出现:
根据groupId搜索

在搜索输入框输入项目的 groupId,找到并选择你刚刚打包上传的项目。点击上方的 Close 按钮:
close

再在弹窗中点击 Confirm 按钮,过几秒后再点击上面的 Refresh 按钮进行刷新,就可以看到如下界面:
close-result

展开下方 Activity 面板的结果信息,如果出现如上图的信息,即表示构建通过。
再过几秒后再次点击点击上面的 Refresh 按钮进行刷新,就会看到旁边的 Release 按钮变为可操作状态:
发布按钮

最后点击 Release 按钮,出现弹窗:
确认发布

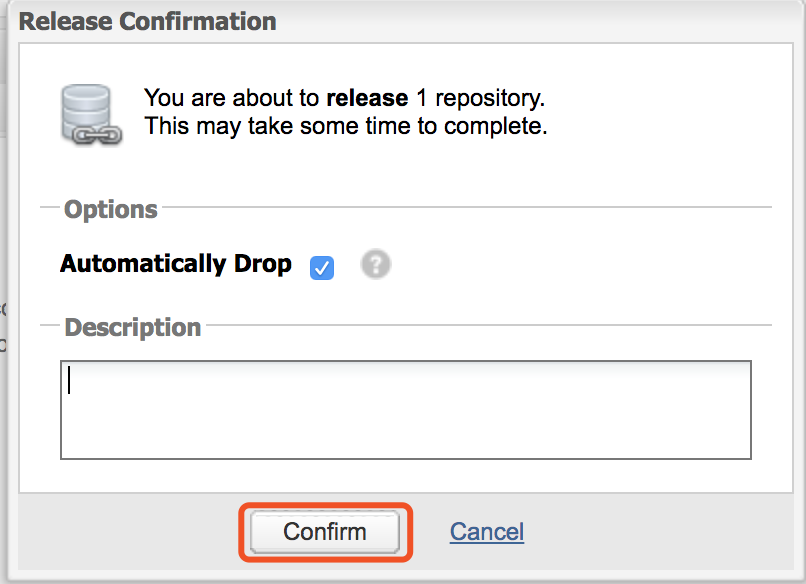
点击 Confirm 按钮,确认发布构建,至此发布构建的的步骤全部结束。
再等待大概一到两小时的同步时间后,便可以在中央仓库中搜索到你发布的项目了:
搜索

修改 README.md 文件

在项目的 README.md 头部 加上 如下格式的内容:

1
[![Maven Central](https://maven-badges.herokuapp.com/maven-central/<groupId>/<projectName>/badge.svg)](https://maven-badges.herokuapp.com/maven-central/<groupId>/<projectName>)

比如我的这个项目的 gorupIdpro.wangfengprojectNamecommon-lang,则加上:

1
[![Maven Central](https://maven-badges.herokuapp.com/maven-central/pro.wangfeng/common-lang/badge.svg)](https://maven-badges.herokuapp.com/maven-central/pro.wangfeng/common-lang)

之后就会出现如下显示:
svg

最后再给出两个在打包时十分有用的 maven 命令:

  • 更新父模块到指定版本号:
1
mvn versions:set -DnewVersion=1.0.1-SNAPSHOT
  • 更新子模块版本到与模块相同:
1
mvn -N versions:update-child-modules

参考

  1. 将jar发布到maven中央仓库小记
  2. 向maven中央仓库提交jar